My studio monitors have never blown because I follow a strict regimen when handling and using them. However, they can and do blow in some cases, and I have had some people ask me how to tell if they are blown and what parts to check on and inside their studio monitors. Here is a comprehensive article on do’s and don’ts, along with how to check if your studio monitors are blown.
You will know if your studio monitors are blown through many ways, including heavy distortion, pops, hissing, cracks, no sound at all, rumbling, and humming. They could be blown because of several factors that include faulty, broken, or damaged materials and components (wires, chassis, drivers, suspension, voice coil, magnets, and more).
In this article, we will cover the term “blown” and its definition when referring to studio monitors. We will then cover how to tell if your studio monitors are blown and how to keep them from blowing. Lastly, we will also go over a step-by-step tutorial on how to check which parts of your studio monitors could be damaged, faulty, blown, or broken.
Let’s get started.
Keep track of all your music and notes in one convenient place!
Over 1000 sold to songwriters everywhere – with a 5-star rating.
What Are Studio Monitors?
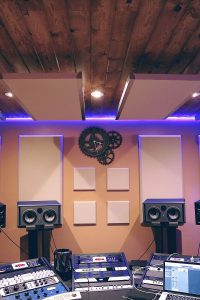
Studio monitors are specialized speakers that are designed differently than the speakers in your average home theater system. They are designed to be either near-field or mid-field (this means you need to sit close to the studio monitors for them to have their desired effect).
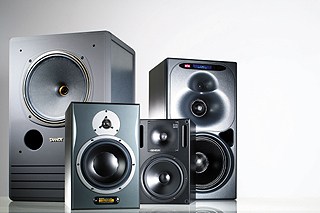
Also, they are designed with a flat response (this means that no frequency is boosted or cut to emphasize the listening experience). Studio monitors are designed to have a “bad” sound.
That does not mean they are bad quality (the build, design, and material), and the sound is horrible. Contrary to that, they are built for critical and specific audio listening. They are used in the recording studio for referencing audio for recording, mixing, producing, and mastering.
Defining The Term “Blown” For Studio Monitors
The word “blown” is not a technical term but a term used by people when their speakers or monitors do not work correctly. This term could refer to any form of damage or weird sound that a speaker or monitor has.
Some examples that might indicate a blown studio monitor or speaker would be:
- distortion
- noise
- crackles
- hisses
- pops
- no sound at all
If we use the term “blown” as we should, it refers to a speaker or monitor that is damaged or is not working because it has been over-driven from mechanical stress. Mechanical stress would be the drivers (tweeters and woofers) moving too far forwards and backward outside the range they are designed to move in.
Another example of how your studio monitors could get damaged is by heat burning out the voice coil wire. At this point, one or all the drivers (tweeters and woofers) will stop working completely.
How To Tell If Your Studio Monitors Are Blown
As we said, there could be various ways to tell if your studio monitors are blown. However, the most typical way is to hear it when you are listening to your studio monitors.
That being said, there will be distortion, noise, rumbling, no sound at all, skips in the audio, and so forth. Your ears are the best reference you can use to tell if your studio monitors are blown.
Here is another thing you can do if you can’t tell whether your studio monitors are blown or not. Take the same audio track and play it on different systems at the same volume.
Slowly turn up the volume. Then, you can compare the audio between the two systems to get a better sense of what’s going on.
How To Tell If Something Else Is Wrong With Your Studio Monitors
There are various ways to tell if something else is wrong with your studio monitors. In some cases, you would hear a rubbing sound, which could cause your monitors to crackle.
Sometimes this occurs on certain notes with certain music, and sometimes it happens all the time.
From a tweeter, you might hear a buzzing sound or slight rattling sound. All these factors point to a situation that your speakers or monitors have been over-driven.
Watch Axion Audio help you tell if your studio monitors are blown.
Active vs Passive Studio Monitors (Which Ones Blow More Easily?)
Active studio monitors have built-in powered amplifiers. Manufacturers spend thousands of hours and tons of money developing their studio monitors.
When studio monitors are built with powered amplifiers in them, more likely than not, they will be built to the same specifications in terms of power (watts) that the drivers (woofers and tweeters can handle).
You are pretty much able to turn active monitors all the way up to get the loudest sound possible. (If your studio monitors are too quiet, read this article to find out why).
However, there are cases where the audio you are listening to has been mixed a certain way, and some frequencies will be boosted. This may cause distortion or unwanted noise (especially if the bass frequencies have been boosted).
So, be sure to look out for that. If some frequencies have been boosted, a large amount of distortion from the drivers could cause your speakers to blow.
Passive studio monitors are a bit more user intensive. You need to purchase the correct amplifier that will drive your studio monitors with the correct amount of power.
If you purchase a powered amplifier to drive your studio monitors and the amplifier’s power is considerably higher than what your studio monitors are capable of handling, you have to be very careful not to push the amplifier (turning it louder) because your studio monitors will not be able to handle it and they will definitely blow.
Purchasing The Correct Powered Amplifier For Your Passive Studio Monitors
Studio monitor standalone powered amplifiers are usually small in terms of power (watts) compared to amplifiers that will drive your PA system. They will range from about 20watts to 200watts. Anything above this and the powered amplifier is probably built to drive your PA system.
Hence, be sure to look at the watts for both your powered amplifier and your passive studio monitors to make sure they both have the same watts.
How To Prevent Studio Monitors From Blowing
There are a few ways that you can accomplish this. I’ve detailed some points for you to go over and check.
Your Ears
Your ears are a great way to tell if your speakers or studio monitors are being over-driven. In the case of being over-driven, either your speakers, monitors, or amplifier are not happy.

In this case, the monitors will sound very distorted, harsh, thin, and bright. This is an indication that your speakers are probably too loud, and you should turn them down.
Powered Amplifiers
You need to make sure that you purchase the correct powered amplifier that accompanies your passive studio monitors or speakers. As we discussed, you have to make sure that the number of watts your powered studio monitor amplifier is pushing out can be handled by your passive studio monitors.
Household Wiring & Current
In some cases (not many), you have to make sure that your house wiring is up to scratch. Sometimes your house could have faulty wiring, and this could cause power surges.
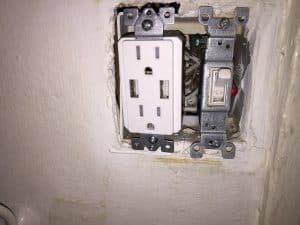
Power surges will blow the internal components of your active studio monitors in a second.
Lightning
Be sure to connect ALL your audio equipment to lightning resistant (surge) plugs and adapters. You may think that this is unnecessary.
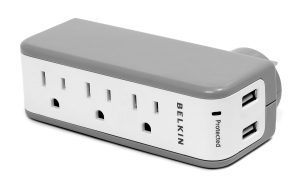
However, there are those few instances when a thunderstorm and lightning hits your house, and then it will fry everything you have, which is thousands of dollars in audio equipment. This actually happened to me once, and thank goodness I was insured; otherwise, I would have been in serious trouble.
Why Can Studio Monitors Blow?
Internal Delicate Materials & Components
Studio monitors (the working components and materials, not the housing) are built from delicate materials and components. The drivers (woofers and tweeters) are especially very delicate and are made from materials such as aramid, paper, or polypropylene. This material can damage and tear so easily.
For active monitors, you then have a built-in powered amplifier, and an amplifier consists of delicate circuitry and components such as transistors, transducers, wires, and a great ton more. Any form of manhandling or power surges, or incorrect power pushed through to your studio monitors can and will probably damage and blow them.
How Are Studio Monitors Made?
Studio monitors are made by manufacturers that spend thousands of hours and dollars on R&D (research and development). Because of this, even though the materials and components that make up the studio monitors are sometimes delicate and fragile, you can rest assured that you are not wasting your money because the materials and components that the studio monitors are made from the highest quality.
Watch Sound On Sound magazine visit the factory of Adam Audio to see what goes into making their studio monitors.
How To Figure Out If My Studio Monitors Are Blown (Self-diagnose)
Step-By-Step Tutorial
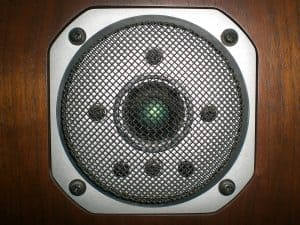
Check The Drivers (Woofers & Tweeters)
What we want to do is first check the drivers (woofers and tweeters). Make sure there is no tear or that they are not damaged in any way. The next thing you will have to do is gently push down on the drivers to see if they give way properly when pressure is applied to them
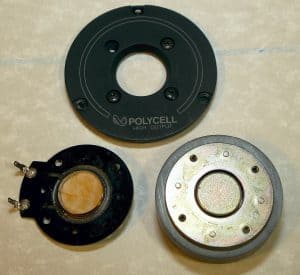
Take note that you have to be very careful when handling the drivers; any amount of unnecessary force will surely cause them to get damaged.
Check The Dust Cap On The Drivers
If your studio monitors sound good overall and there is something wrong in the low end, then usually the woofer’s dust cap has come loose because it is stuck there with glue. All you need to do in this instance is get that appropriate glue or epoxy and then restick the dust cap to the driver.
Check The Driver Gasket
In some cases, you will need to check that gasket of the drivers are not faulty, damaged, or broken. The gasket connects the woofer to the casing of the monitor. If the gasket is damaged or faulty, it would depend if you can fix it yourself or if you would have to get a replacement part or even a replacement driver.
Check The Driver Leads & Terminals
The next thing you should check is that the leads going from the driver to the terminals are attached properly, their soldering is still good, and they are not damaged or broken. Depending on how hard you drive your studio monitors, the driver’s back and forth motion could cause them to break or get damaged.
You can use a multi-meter to test the leads and terminals are working correctly. In some cases, all you need to do is a bit of soldering to get the job done, and in other cases, you would need to replace certain parts depending on what they are.
Check The Suspension
The suspension centers the voice coil in the magnet’s gap, and it exerts a force to keep it there, and the suspension limits the maximum mechanical excursion of the driver and voice coil.
You would have to check if this driver’s component is damaged, and unfortunately, you would have to get a replacement part if you could; otherwise, you would have to send it in for repair. Otherwise, you would have to replace the driver in its entirety.
Check The Voice Coil
The voice coil of the driver is the coil of wire that is attached to the driver. This is where the electric field generated by the current propels the driver to move for the audio to get converted into sound waves that we can hear.
The voice coil is a bit tricky, and there are a few things you would need to look out for. Because all voice coils are built differently to some degree (amount of threads around the coil), you wouldn’t be able to unravel the wire and inspect it.
You would need to use a multi-meter to check if the current is passing through it correctly and then just visually check that it is in good condition and that there is no wear or tear on it.
Check The Chassis
The chassis is the metal casing that the driver and all the related driver components sit in and fit on. Usually, there is nothing wrong with the chassis because it is made from some sort of metal, so it is very sturdy, rigid, and strong.
Unfortunately, if you are faced with a crack in the chassis, or there is some problem that just can’t be fixed with a DIY effort, the sad reality is that you are probably going to have to replace the chassis if you can (some components of the driver are fixed permanently to it) otherwise the entire driver.
Check The Magnets
Your driver’s magnets could be damaged, lose, or even demagnetized (although magnets lose 1% of their power every ten years, and some are magnetized indefinitely). You could also cause a magnet to get demagnetized by hitting, dropping, and throwing it with great force.
In any case, if you see that there is a problem with your magnet, you do not have to worry too much, you do get replacement parts, and they are relatively easy to replace.
Check The Wiring
The next thing to check is the internal wiring of your studio monitors. Ensure that all the endpoints are still soldered correctly and that the wires are not bent, damaged, or broken.
Wires are probably the easiest thing to replace and repair in studio monitors or any speakers for that fact. Just go out and get yourself some solder, a soldering gun, and some high-quality audio wire and get to work.

You do not need a degree to solder a wire in place, so don’t be afraid to do it, rather than shelling out hundreds of dollars for someone else to do what you could easily yourself do.
Check The Powered Amplifier (Active Speakers)
In the case of active studio monitors, you would have to check that the powered amplifier is still working correctly. Unfortunately, if you do not know exactly how they work, you will not know what’s going on.
However, you can check that the current is flowing through the amplifier with a multi-meter. If it is not, then, unfortunately, you will have to send it in for repairs or get it replaced.
Watch pat the sound guy go over checking the leads and terminals of a speaker.
Replacing Parts For Studio Monitors
If you find that your studio monitors are blown, or some materials or components need to be replaced, then all you need to do is contact the manufacturer that has built your studio monitors and ask them if and where replacement parts are available.
If some materials or parts are not available, they will be sure to give you the number of a technician who could repair your studio monitors for you.
Conclusion
In conclusion, we can self diagnose and check almost all aspects of our studio monitors to see if they are blown or damaged in any way. For the most part, checking and correcting minor faults is no problem.
However, if something is severely damaged or faulty, you might need to send them in for repair (or possibly purchase a new monitor).
The steps we took to figure out if our monitors are blown or faulty are pretty straightforward and laid out in logical steps, and there is no circumstance that you would not be able to follow the easy step-by-step tutorial.
Remember that your ear is the best tool to check if your monitors are blown, and then all you do is take it from there.
If you want to prolong the life of your studio monitors, turn them off when not in use.
If you are just starting to get set up, you can learn about the cables you need for studio monitors here.